
Table of Contents
1. Introduction
When you install Elasticsearch from rpm package user called elasticsearch is created and used later on to start process. In enterprise environment you may encounter custom user to be required owner of elasticsearch process. Therefor it is necessary for you to understand how to deal with such requirement and adjust system settings to make it possible. To follow this tutorial you need to have one of virtual machine manager like VMWare, Parallels, VirtualBox or any other you are familiar with.
2. Install Rocky Linux
Download minimal ISO from Rocky Linux Download page
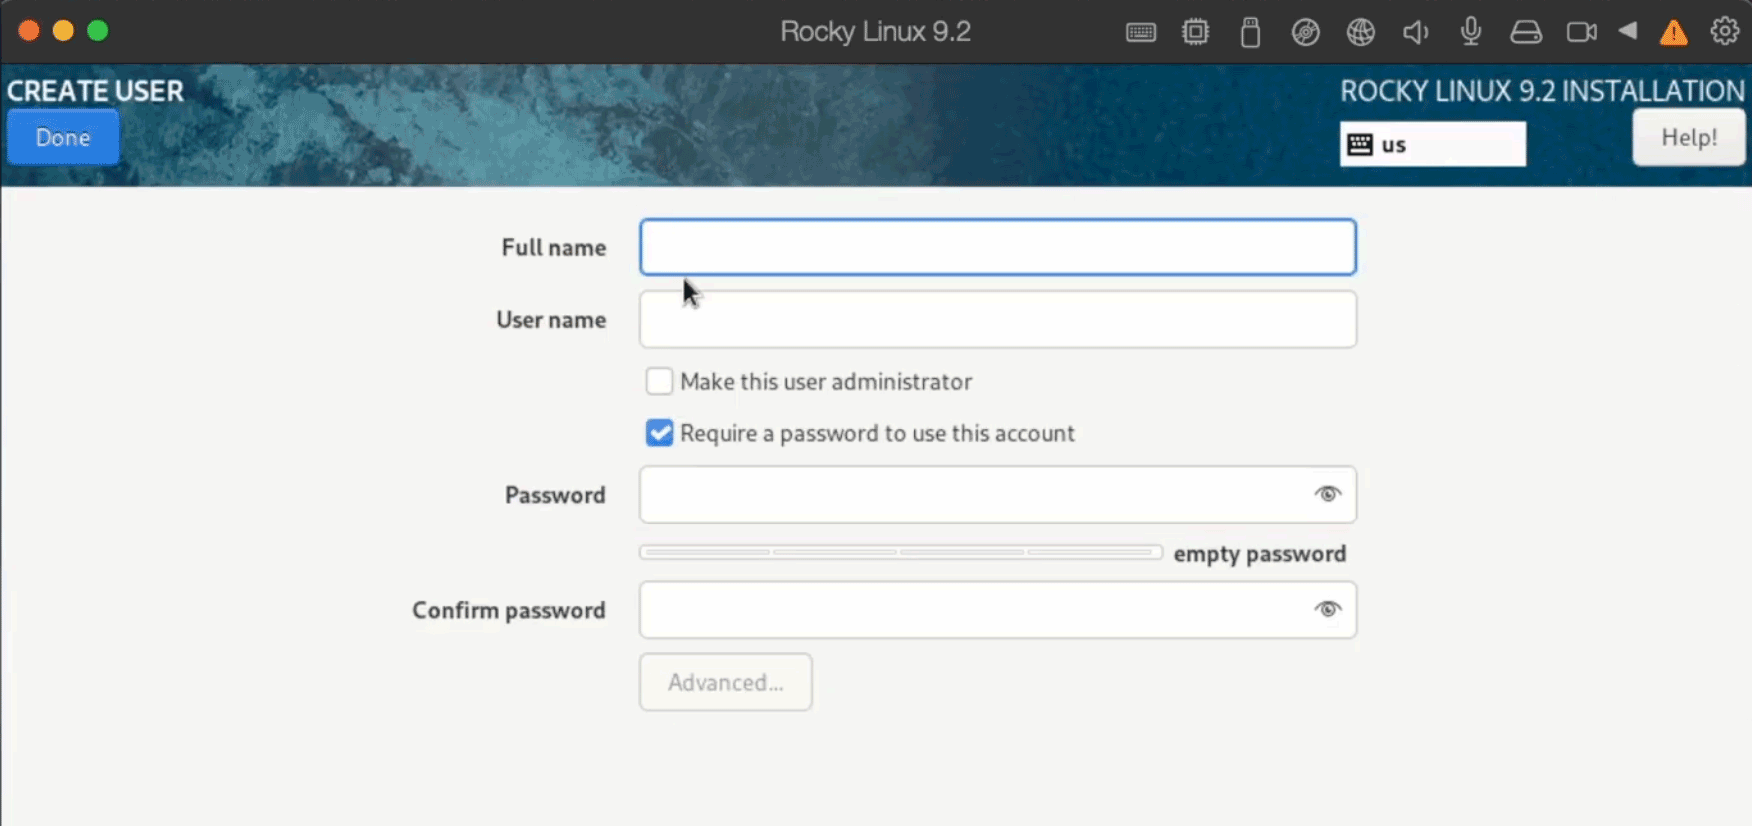
I have used Rocky Linux 9.2
Then use your virtual machine manager to create node with this OS.
During installation you can create already your future user for Elasticsearch process. In my example I created tomd user.
Once installation is done reboot of VM is needed. After that type command to obtain ip address.
ip addr
Returned value can be used then to connect with SSH from your host machine.
3. Install Elasticsearch
All commands in this article I am running as root.
To use provided by Elastic team GPG-KEY-elasticsearch please update policy. Otherwise you will see error
Signature not supported. Hash algorithm SHA1 not available.
error: https://artifacts.elastic.co/GPG-KEY-elasticsearch: key 1 import failed.
To update crypto policies and install key run
					update-crypto-policies --set LEGACY
rpm --import https://artifacts.elastic.co/GPG-KEY-elasticsearch
To install elastic yum repository run
					bash -c "cat <<EOF >/etc/yum.repos.d/elasticsearch.repo
[elasticsearch]
name=Elasticsearch repository for 8.x packages
baseurl=https://artifacts.elastic.co/packages/8.x/yum
gpgcheck=1
gpgkey=https://artifacts.elastic.co/GPG-KEY-elasticsearch
enabled=0
autorefresh=1
type=rpm-md
EOF"

yum update
Finally run elasticsearch installation
yum -y install --enablerepo=elasticsearch elasticsearch-8.9.1
It will take a while until it’s finished but not extra long 🙂
4. Set up Java Home
Elasticsearch comes with bundled OpenJDK so no need to install java explicitly. Recommended by elastic team is to use that version. Additionally it is worth to set JAVA_HOME environment variable in case of future 3rd party software integration.
					JAVA_HOME_DIR=/usr/share/elasticsearch/jdk
bash -c "cat <<EOF >/etc/profile.d/jdk_home.sh
export JAVA_HOME=$JAVA_HOME_DIR
export PATH=$PATH:$JAVA_HOME_DIR/bin
EOF"
5. Disable SWAP
Swapping data into disk can drastically slow down performance. In order to maximize performance keep it disabled.
					sed -i 's/^[^#]*swap/#&/' /etc/fstab
mount -a
Then confirm swap usage – should be zero.
free | awk '/Swap:/ {print $3}'
6. Set user process limits
Setup limits for user that going to run elasticsearch. “nproc” is for maximum number of processes equal to 64000. “as” is for maximum size virtual memory and “fsize” is for max file size.
					cat <<EOF >/etc/security/limits.d/elasticsearch.conf
tomd             soft    nproc           64000
tomd             hard    nproc           64000
tomd             soft    as           unlimited
tomd             hard    as           unlimited
tomd             soft    fsize           unlimited
tomd             hard    fsize           unlimited
EOF
7. Custom service settings
You can place data into custom catalog. For that create one and update paths in config files.
					mkdir /elkdata
sed -i 's/\/var\/lib\/elasticsearch/\/elkdata/gi' /etc/elasticsearch/elasticsearch.yml
grep data /etc/elasticsearch/elasticsearch.yml
Note “User” and “Group” in service config file and how ownership is changed for “/var/run/elasticsearch” catalog – over there elasticsearch.pid file will be created containing PID number.
					mkdir -p /etc/systemd/system/elasticsearch.service.d/
bash -c "cat <<EOF >/etc/systemd/system/elasticsearch.service.d/elasticsearch.conf
[Service]
LimitMEMLOCK=infinity
LimitNPROC=64000
User=tomd
Group=tomd
Environment=DATA_DIR=/elkdata
ExecStartPre=-/bin/mkdir -p /var/run/elasticsearch
ExecStartPre=/bin/chown tomd:tomd /var/run/elasticsearch
PermissionsStartOnly=true
EOF"
After system reboot ownership of /var/run/elasticsearch getting lost because /var/run being cleaned out. In order to fix that set additional config file
					bash -c "cat <<EOF >/usr/lib/tmpfiles.d/elasticsearch.conf
d    /var/run/elasticsearch   0755 tomd tomd - -
EOF"
8. Update files ownership
Files ownership of default Elasticsearch installation will be assigned to “elasticsearch” user. Therefore you have to change this
					chown -R tomd:tomd /elkdata
chown -R tomd:tomd /var/run/elasticsearch
chown -R root:tomd /etc/elasticsearch
chown -R tomd:tomd /etc/sysconfig/elasticsearch
chown -R tomd:tomd /var/log/elasticsearch
9. Production mode
Elasticsearch will treat instance as production once network.host parameter is set explicitly. There few more parameters worth to set.
cluster.name: tomd-prod
node.name: node01
bootstrap.memory_lock: true
network.host: # your IP number from ip addr output
cluster.initial_master_nodes: ["node01"]
Once done with editing please save the file.
10. Start Elasticsearch
Three commands left to execute for successful startup. Daemon relaod because you touch /etc/systemd/system/elasticsearch.service.d/ , enable service so it is starting together with linux and start because you want to start it now.
					systemctl daemon-reload
systemctl enable elasticsearch.service

systemctl start elasticsearch.service
Check status of service to know if it started successfully.
					systemctl status elasticsearch.service
# or
service elasticsearch status

[root@localhost ~]# service elasticsearch status
Redirecting to /bin/systemctl status elasticsearch.service
● elasticsearch.service - Elasticsearch
     Loaded: loaded (/usr/lib/systemd/system/elasticsearch.service; enabled; preset: disabled)
    Drop-In: /etc/systemd/system/elasticsearch.service.d
             └─elasticsearch.conf
     Active: active (running) since Sun 2023-09-03 22:52:41 CEST; 15s ago
       Docs: https://www.elastic.co
    Process: 798 ExecStartPre=/bin/mkdir -p /var/run/elasticsearch (code=exited, status=0/SUCCESS)
    Process: 801 ExecStartPre=/bin/chown tomd:tomd /var/run/elasticsearch (code=exited, status=0/SUCCESS)
   Main PID: 804 (java)
      Tasks: 78 (limit: 22726)
     Memory: 2.4G
        CPU: 17.416s
     CGroup: /system.slice/elasticsearch.service
             ├─ 804 /usr/share/elasticsearch/jdk/bin/java -Xms4m -Xmx64m -XX:+UseSerialGC -Dcli.name=server -Dcli.>
             ├─1361 /usr/share/elasticsearch/jdk/bin/java -Des.networkaddress.cache.ttl=60 -Des.networkaddress.cac>
             └─1389 /usr/share/elasticsearch/modules/x-pack-ml/platform/linux-aarch64/bin/controller

Sep 03 22:52:31 localhost.localdomain systemd[1]: Starting Elasticsearch...
Sep 03 22:52:41 localhost.localdomain systemd[1]: Started Elasticsearch.
If you list processes you will also see that “tomd” user is running Elasticsearch.
ps aux | grep elasticsearch
11. Connect with client
Before connecting to node please setup password for built-in user “elastic”
You can run creator elasticsearch-reset-password and follow steps
					cd /usr/share/elasticsearch/bin/
./elasticsearch-reset-password -u elastic -i
or if you are lazy, you can set password like 123456 but that’s not recommended of course – only for testing.
(mkfifo pipe1);( (/usr/share/elasticsearch/bin/elasticsearch-reset-password -u elastic -i < pipe1) & ( echo $'y\n123456\n123456' > pipe1) ) ;rm -f pipe1
Then run curl command to connect to elastic and display cluster healthcheck
					curl --cacert /etc/elasticsearch/certs/http_ca.crt -u elastic https://localhost:9200/_cluster/health?pretty

# or if you run just to play around

curl --cacert /etc/elasticsearch/certs/http_ca.crt -u elastic:123456 https://localhost:9200/_cluster/health?pretty

{
  "cluster_name" : "tomd-prod",
  "status" : "green",
  "timed_out" : false,
  "number_of_nodes" : 1,
  "number_of_data_nodes" : 1,
  "active_primary_shards" : 1,
  "active_shards" : 1,
  "relocating_shards" : 0,
  "initializing_shards" : 0,
  "unassigned_shards" : 0,
  "delayed_unassigned_shards" : 0,
  "number_of_pending_tasks" : 0,
  "number_of_in_flight_fetch" : 0,
  "task_max_waiting_in_queue_millis" : 0,
  "active_shards_percent_as_number" : 100.0
}
12. Summary
That’s it for now. You have learned how to setup one-node Elasticsearch cluster with custom user and custom data location. Do not hesitate to share your experience in comments below or on my youTube channel. I am looking forward to hear feedback.