Table of Contents
1. Introduction
Entity classification can be done with NLP NER model provided by elastic team. Due to presence of ML module you can deploy model and keep it for inference inside your ELK cluster.
2. Start Elasticsearch Node
Run commands
					docker network create elkai

docker run --rm \
--name elk \
--net elkai \
-e ES_JAVA_OPTS="-Xms4g -Xmx4g" \
-e xpack.license.self_generated.type=trial \
-d \
-p 9200:9200 \
docker.elastic.co/elasticsearch/elasticsearch:8.15.2
Note that license is required to use ML. For single Machine Learning node minimum recommendation is 16GB. Machine learning jobs are off heap because their run in Python environment not JVM. Good for them, no garbage collector issues.
Now setup example password for ‘elastic’ user
docker exec -it elk bash -c "(mkfifo pipe1); ( (elasticsearch-reset-password -u elastic -i < pipe1) & ( echo $'y\n123456\n123456' > pipe1) );sleep 5;rm pipe1"
3. Deploy named entity recognition (NER) model
The model you going to deploy is hosted on hugging face under elastic account. Elastic providing python agent that download model blobs and install them in ELK ML node
					docker run --rm \
--net elkai \
docker.elastic.co/eland/eland \
eland_import_hub_model \
--url https://elastic:123456@elk:9200 \
--hub-model-id elastic/distilbert-base-uncased-finetuned-conll03-english \
--insecure \
--task-type ner \
--start
Instead of providing user:password you can use token for authentication.
Get information about deployed model:
curl -k -u elastic:123456 -XGET "https://localhost:9200/_ml/trained_models/elastic__distilbert-base-uncased-finetuned-conll03-english?pretty"
response
					{
  "count": 1,
  "trained_model_configs": [
    {
      "model_id": "elastic__distilbert-base-uncased-finetuned-conll03-english",
      "model_type": "pytorch",
      "created_by": "api_user",
      "version": "12.0.0",
      "create_time": 1724967294296,
      "model_size_bytes": 0,
      "estimated_operations": 0,
      "license_level": "platinum",
      "description": "Model elastic/distilbert-base-uncased-finetuned-conll03-english for task type 'ner'",
      "tags": [],
      "metadata": {
        "per_allocation_memory_bytes": 616030272,
        "per_deployment_memory_bytes": 265483300
      },
      "input": {
        "field_names": [
          "text_field"
        ]
      },
      "inference_config": {
        "ner": {
          "vocabulary": {
            "index": ".ml-inference-native-000002"
          },
          "tokenization": {
            "bert": {
              "do_lower_case": true,
              "with_special_tokens": true,
              "max_sequence_length": 512,
              "truncate": "first",
              "span": -1
            }
          },
          "classification_labels": [
            "O",
            "B_PER",
            "I_PER",
            "B_ORG",
            "I_ORG",
            "B_LOC",
            "I_LOC",
            "B_MISC",
            "I_MISC"
          ]
        }
      },
      "location": {
        "index": {
          "name": ".ml-inference-native-000002"
        }
      }
    }
  ]
}
4. Infer model
Now you know that input should be “text_field” so let’s practice.
					curl -k -u elastic:123456 -XPOST "https://localhost:9200/_ml/trained_models/elastic__distilbert-base-uncased-finetuned-conll03-english/_infer?pretty" \
-H 'Content-Type: application/json' \
-d'
{
"docs":[{"text_field": "The Monika went on the party"}]
}
'
response
					{
 "inference_results" : [
  {
     "predicted_value" : "The [Monika](MISC&Monika) went on the party",
     "entities" : [
      {
         "entity" : "monika",
         "class_name" : "MISC",
         "class_probability" : 0.7870051587124858,
         "start_pos" : 4,
         "end_pos" : 10
      }
     ]
  }
 ]
}
you can see that ‘Monika’ has been detected as entity with category ‘misc’
5. Try model in Kibana
5.1. Enroll token and connect to Elastic node
					# save response of API call into variable
RESPONSE_JSON=`curl -k -XGET -u elastic:123456 "https://localhost:9200/_security/enroll/kibana"`

# Get the value of "http_ca" from the JSON response
http_ca=$(echo "$RESPONSE_JSON" | jq -r '.http_ca')
# Get service account token value
kibanatoken=$(echo "$RESPONSE_JSON" | jq -r '.token.value')

# Create the certificate file with the proper structure
echo "$http_ca" | sed 's/^/-----BEGIN CERTIFICATE-----\n/; s/$/\n-----END CERTIFICATE-----/' > http_ca.crt
5.2. Start Kibana node
					docker run --rm \
--name kibana \
--net elkai \
-v ./http_ca.crt:/http_ca.crt \
-d \
-p 5601:5601 \
-e ELASTICSEARCH_SSL_VERIFICATIONMODE=certificate \
-e ELASTICSEARCH_HOSTS=https://elk:9200 \
-e ELASTICSEARCH_SERVICEACCOUNTTOKEN=$kibanatoken \
-e ELASTICSEARCH_SSL_CERTIFICATEAUTHORITIES=/http_ca.crt \
docker.elastic.co/kibana/kibana:8.15.2
synchronize saved objects
curl -u elastic:123456 -XGET "http://localhost:5601/api/ml/saved_objects/sync"
response should be:
					{
  "savedObjectsCreated": {
    "trained-model": {
      "elastic__distilbert-base-uncased-finetuned-conll03-english": {
        "success": true
      }
    }
  },
  "savedObjectsDeleted": { },
  "datafeedsAdded": { },
  "datafeedsRemoved": { }
}
5.3. Actions in UI
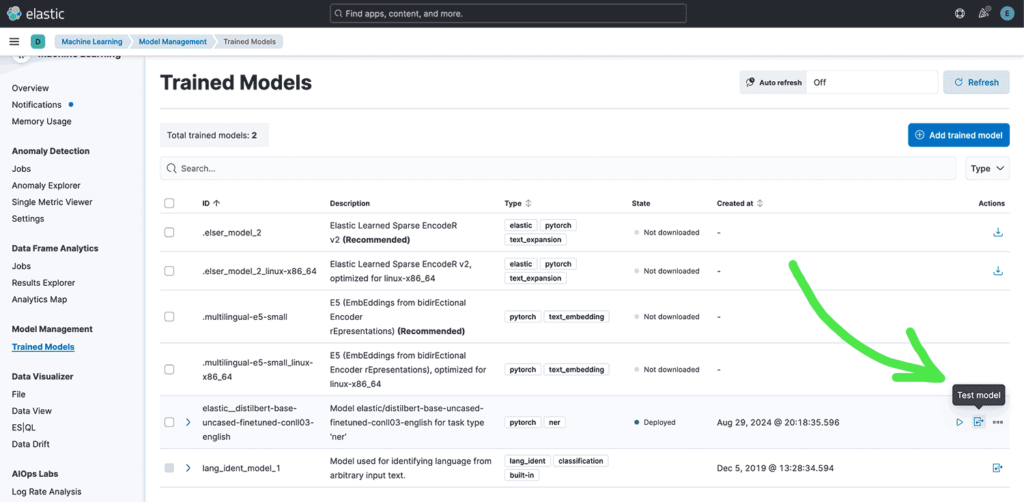
Go to Machine Learning > Trained Models

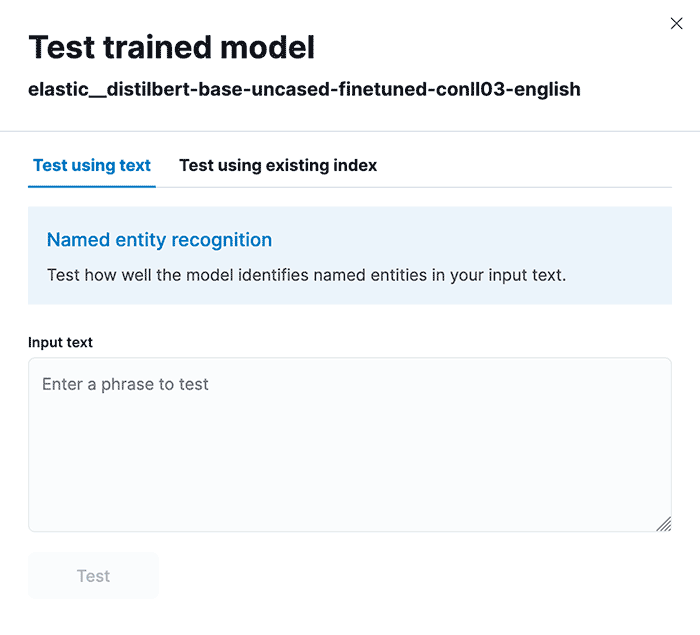
After click dialog will pop-up

You can enter any text and Test it.
6. BUG with ARM architecture
Unfortunately on ARM systems there is bug related to older version of PyTorch. Check forum for further details.
https://github.com/elastic/elasticsearch/issues/106206
This affecting versions 8.15.1 and older, therefore please use 8.15.2 version.
7. Final thoughts
In this knowledge article you have learned how to start Elasticsearch node with ML enabled functionalities, then you practice how to load AI model using python eland client. Finally you repeat same in Kibana.
Have a nice coding!


