Table of Contents
1. Introduction
In previous article I described how to authenticate to Elasticsearch using tokens. You were able to execute all commands and see yourself how it works. There might be few points although that can be further explain.
1.1 Start Elasticsearch
					docker run --rm \
--name elk \
-e xpack.license.self_generated.type=trial \
-d \
-p 9200:9200 \
docker.elastic.co/elasticsearch/elasticsearch:8.10.4


# reset password
docker exec -it elk bash -c "(mkfifo pipe1); ( (elasticsearch-reset-password -u elastic -i < pipe1) & ( echo $'y\n123456\n123456' > pipe1) );sleep 5;rm pipe1"
2. Giving temporary access to someone with bearer ticket
Tokens can be a way to give someone temporary access to Elasticsearch.
Always you can create new user and distribute password for him but then you need to remember to revoke his access. Instead you can create new user and then token for that user and give it to interested person. Token does not provide fine tuning for permission as you can get from API Keys service but you can define what is needed on role level that later on is assigned to user and create ticket for that user with grant type password.
2.1. Load test data
To have some nice example you will load sample document into Elasticsearch that your potential customer want to access.
					curl -k -XPOST -u elastic:123456 "https://localhost:9200/personaldocument/_doc" \
-H 'Content-Type: application/json' -d'
{
    "name": "John",
    "surname": "Smith",
    "balance": 345.56
}'
Example response:
{"_index":"personaldocument","_id":"b8jpuosB4bZfpycPC56y","_version":1,"result":"created","_shards":{"total":2,"successful":1,"failed":0},"_seq_no":0,"_primary_term":1}
2.2 Define role for user
Role should limit user activity. Imagine he wants to access particular index that you created in previous step.
					curl -k -XPOST -u elastic:123456 "https://localhost:9200/_security/role/readertest" \
-H 'Content-Type: application/json' -d'
{
        "indices": [
            {
                "names": [
                    "personaldocument"
                ],
                "privileges": [
                    "read"
                ]
            }
        ]
}'
2.3 Create user and assign role
You will create now new user with some password and role defined in previous step.
					curl -k -XPOST -u elastic:123456 "https://localhost:9200/_security/user/onetimereader" \
-H 'Content-Type: application/json' -d'
{
    "password":"123456",
    "roles": ["readertest"]
}'
2.4 Create token for user
To create token for user ‘onetimereader’ run command
					curl -k -u elastic:123456 -XPOST "https://localhost:9200/_security/oauth2/token" \
-H 'content-type: application/json' -d'
{
  "grant_type" : "password",
  "username" : "onetimereader",
  "password" : "123456"
}'
example response:
					{
    "access_token": "3eaGBBik81XAZe1Y3LvDg+Dj0xXBs2XnZ63HNsUAAAA=",
    "type": "Bearer",
    "expires_in": 30,
    "refresh_token": "3eaGBBjH6QmvbxBu1Xikv2agJs5vs2XnZ63HNsUAAAA=",
    "authentication": {
        "username": "onetimereader",
        "roles": [
            "readertest"
        ],
        "full_name": null,
        "email": null,
        "metadata": {},
        "enabled": true,
        "authentication_realm": {
            "name": "default_native",
            "type": "native"
        },
        "lookup_realm": {
            "name": "default_native",
            "type": "native"
        },
        "authentication_type": "realm"
    }
}
2.5 User can access his data
Now your customer can access particular data without knowing his password. Give him token “3eaGBBik81XAZe1Y3LvDg+Dj0xXBs2XnZ63HNsUAAAA=” and ask to use it.
					curl -k -H "Authorization: Bearer 3eaGBBik81XAZe1Y3LvDg+Dj0xXBs2XnZ63HNsUAAAA=" \
-XPOST "https://localhost:9200/personaldocument/_search" -H 'content-type: application/json'
he will get response:
					{
    "took": 46,
    "timed_out": false,
    "_shards": {
        "total": 1,
        "successful": 1,
        "skipped": 0,
        "failed": 0
    },
    "hits": {
        "total": {
            "value": 1,
            "relation": "eq"
        },
        "max_score": 1.0,
        "hits": [
            {
                "_index": "personaldocument",
                "_id": "b8jpuosB4bZfpycPC56y",
                "_score": 1.0,
                "_source": {
                    "name": "John",
                    "surname": "Smith",
                    "balance": 345.56
                }
            }
        ]
    }
}
2.6 User has no right to create token
User cannot create token for himself. First you will not share his password so he cannot access Elasticsearch without token, secondly his permission do not allow to create any token. Moreover he cannot make a use of refresh_token even if you share it with him.
					curl -k -H "Authorization: Bearer 3eaGBBgd4YCYB6NbG+Y750Q5GxqxyCEHdYdo0KgAAAA=" -XPOST "https://localhost:9200/_security/oauth2/token" -H 'content-type: application/json' -d'
{
  "grant_type" : "client_credentials"
}'
no permission error:
					{
    "error": {
        "root_cause": [
            {
                "type": "security_exception",
                "reason": "action [cluster:admin/xpack/security/token/create] is unauthorized for user [onetimereader] with effective roles [readertest], this action is granted by the cluster privileges [manage_token,manage_security,all]"
            }
        ],
        "type": "security_exception",
        "reason": "action [cluster:admin/xpack/security/token/create] is unauthorized for user [onetimereader] with effective roles [readertest], this action is granted by the cluster privileges [manage_token,manage_security,all]"
    },
    "status": 403
}
2.7 Extending token for user
If your customer will report ‘The access token expired’ error then you can create a new one for him using refresh_token or password grant type.
					curl -k -u elastic:123456  -XPOST "https://localhost:9200/_security/oauth2/token" \
-H 'content-type: application/json' -d'
{
  "grant_type" : "refresh_token",
  "refresh_token": "3eaGBBjH6QmvbxBu1Xikv2agJs5vs2XnZ63HNsUAAAA="
}'
3. Change time expiration
Unfortunately for tokens expiration time is handled by global static setting ‘xpack.security.authc.token.timeout’ different than with API Keys where you can modify it per key. To start your cluster as docker container with 30 seconds timeout for docker use command.
					docker run --rm \
--name elk \
-e xpack.license.self_generated.type=trial \
-e xpack.security.authc.token.timeout=30s \
-d \
-p 9200:9200 \
docker.elastic.co/elasticsearch/elasticsearch:8.10.4

# reset password
docker exec -it elk bash -c "(mkfifo pipe1); ( (elasticsearch-reset-password -u elastic -i < pipe1) & ( echo $'y\n123456\n123456' > pipe1) );sleep 5;rm pipe1"
maximum value is 1 hour and if you try to set it more than that you will encounter an error
"error.message":"failed to parse value [3601s] for setting [xpack.security.authc.token.timeout], must be <= [1h]"
4. Token creating token
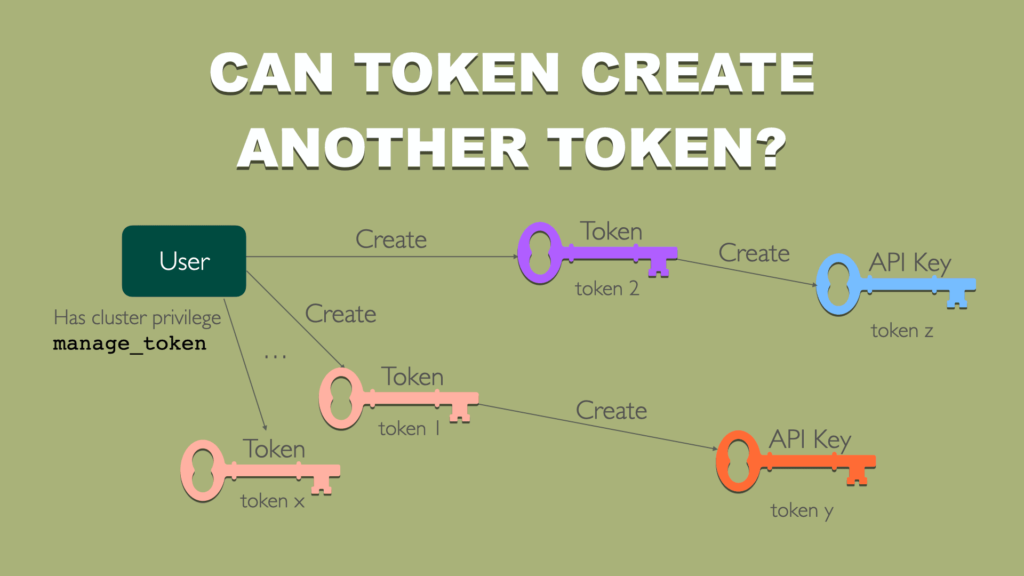
User with cluster privilege like manage_token can create token and use this as authentication to create another token. This is different from API Keys where child key can only authenticate without any permission. Here no restriction.

I was curious if I can reach limit of nested keys and run script that
- Generate initial token using user/pass authentication
- Use obtained token to create next token
- Repeat step 2. infinitively
I used Go language and basically I achieved 3 050 371 level then app crashed due to “goroutine stack exceeds 1000000000-byte limit”. It means you can create basically as many tokens as you want.
4.1 Running script
4.1.1. Install Go
If you haven’t already, you need to install the Go programming language. You can download it from the official Go website
4.1.2. Create a Go project directory
Create a new directory for your Go project.
4.1.3. Create a Go module
In your project directory, create a Go module to manage dependencies. Open a terminal in your project directory and run the following command:
go mod init myoauth2project
4.1.4. Add dependencies
Add the “github.com/go-resty/resty” package to your Go module by running the following command:
go get github.com/go-resty/resty/v2
4.1.5. Create a Go file
Create a new Go file (e.g., `tokenBomb_recursive.go`) in your project directory and paste the provided script into that file.
					package main

import (
	"fmt"
	"log"
    "os"
	"crypto/tls"
	"github.com/go-resty/resty/v2"
)

var user = "elastic"
var password = "123456"

var logFile *os.File


// TokenResponse represents the JSON response from obtaining a token.
type TokenResponse struct {
	AccessToken  string `json:"access_token"`
	Type         string `json:"type"`
	ExpiresIn    int    `json:"expires_in"`
	RefreshToken string `json:"refresh_token"`
}

func main() {

	// Open a log file for writing
	var err error
	logFile, err = os.Create("token_creation.log")
	if err != nil {
		log.Fatalf("Failed to open log file: %v\n", err)
		return
	}
	defer logFile.Close()
	log.SetOutput(logFile)


	// Initialize the Resty client
	client := resty.New()
	client.SetTLSClientConfig(&tls.Config{InsecureSkipVerify: true})

	// Step 1: Obtain the initial access token
	initialTokenURL := "https://localhost:9200/_security/oauth2/token"
	initialTokenData := map[string]string{
		"grant_type": "client_credentials",
	}

	// Perform the initial token request
	initialTokenResponse, initialTokenErr := requestTokenWithBasicAuth(client, initialTokenURL, initialTokenData, user, password)
	if initialTokenErr != nil {
		log.Fatalf("Failed to obtain initial access token: %v\n", initialTokenErr)
	}

	// Extract the access token from the initial response
	initialAccessToken := initialTokenResponse.AccessToken
	log.Printf("Initial Access Token: %s\n", initialAccessToken)

	// Step 2: Obtain a client credential token using the initial access token
	clientCredentialTokenURL := "https://localhost:9200/_security/oauth2/token"
	clientCredentialTokenData := map[string]string{
		"grant_type": "client_credentials",
	}

	clientCredentialTokenResponse, clientCredentialTokenErr := requestTokenWithBearerAuth(
		client, clientCredentialTokenURL, clientCredentialTokenData, initialAccessToken)
	if clientCredentialTokenErr != nil {
		log.Fatalf("Failed to obtain client credential token: %v\n", clientCredentialTokenErr)
	}

	clientCredentialAccessToken := clientCredentialTokenResponse.AccessToken
	log.Printf("Client Credential Access Token: %s\n", clientCredentialAccessToken)

	// Step 3: Start token expansion
	createTokens(client, clientCredentialTokenURL, clientCredentialTokenData, clientCredentialAccessToken)
}

func createTokens(client *resty.Client, url string, data interface{}, accessToken string) {
	// Create a token
	tokenResponse, tokenErr := requestTokenWithBearerAuth(client, url, data, accessToken)
	if tokenErr != nil {
		log.Printf("Failed to create token: %v\n", tokenErr)
		return
	}

	log.Printf("Token created: %s\n", tokenResponse.AccessToken)

	// Use recursion to create more tokens
	createTokens(client, url, data, tokenResponse.AccessToken)
}

// requestTokenWithBasicAuth sends a POST request to obtain a token with Basic Authentication.
func requestTokenWithBasicAuth(client *resty.Client, url string, data interface{}, username, password string) (*TokenResponse, error) {
	client.SetBasicAuth(username, password)

	return requestToken(client, url, data)
}

// requestToken sends a POST request to obtain a token.
func requestToken(client *resty.Client, url string, data interface{}) (*TokenResponse, error) {
	var tokenResponse TokenResponse

	response, err := client.R().
		SetHeader("content-type", "application/json").
		SetBody(data).
		SetResult(&tokenResponse).
		Post(url)

	if err != nil {
		return nil, err
	}

	if response.StatusCode() != 200 {
		return nil, fmt.Errorf("HTTP status code: %d", response.StatusCode())
	}

	return &tokenResponse, nil
}

// requestTokenWithBearerAuth sends a POST request to obtain a token with Bearer authentication.
func requestTokenWithBearerAuth(client *resty.Client, url string, data interface{}, accessToken string) (*TokenResponse, error) {
	client.SetAuthToken(accessToken)

	return requestToken(client, url, data)
}
4.1.6. Run the script
To run the script, use the `go run` command in your project directory:
go run tokenBomb_recursive.go
This will execute the Go script, which will obtain access tokens, perform expansion, and create tokens.
					2023/11/07 00:09:27 Initial Access Token: 3eaGBBhhkLWqA+y6OvYxlQZtaRe49GFWWnq8MNEAAAA=
2023/11/07 00:09:27 Client Credential Access Token: 3eaGBBiLqyRUWDmhhYMdqTS6l3GlQwX8iqJVkWMAAAA=
2023/11/07 00:09:27 Token created: 3eaGBBi+es181SUVLr8BN59bN0zu2goaXggFsrQAAAA=
2023/11/07 00:09:27 Token created: 3eaGBBiIm8TyR+2qO/lVW6OAD2DUjVUDtnG9K0kAAAA=
2023/11/07 00:09:27 Token created: 3eaGBBj/HNymqdGd8Sa9foJ3i2fk/G4BZRG/NcIAAAA=
2023/11/07 00:09:27 Token created: 3eaGBBjmI39joDpApO9as8JA3uUnn2XEXpgQq9sAAAA=
2023/11/07 00:09:27 Token created: 3eaGBBhQ/DquWCaif+DrvvhFzntMqD3x+DZa/9gAAAA=
...
5. Final thoughts
You did it. You have learned how to create tokens and use them as time limited access for your system guests. Finally you run script that let’s you play with token creation.
Have a nice coding!


