Table of Contents
1. Introduction
Recently I was asked about solution to parse PDF files and capture certain information to be presented in Excel file. Requirements were kinda project specific so don’t want to go into that domain here. What I want to present is simple template to start with and make it easy for developers to add new functionalities.
2. Technology stack
I decided to prepare it using Java because there are already libs that handle PDFs and Excel files. Of course there are wrappers written in Python and others but that is additional layer that might bring some trouble. Let’s keep it simple. Java version I choose is Eclipse Temurin JDK 17 LTS ,because of troubles with 21 won’t go there.
Lib for PDFs parsing is Apache PDFBox
Apache POI will export it to Excel file.
Docker compose watch will make sure that any change will trigger rebuild and refresh app. Moreover this is DevOps concept that can be extended. For example developer do not need to have any Java configured on his laptop and still can build this project via builder container. Additionally Spring Boot will make it robust. That’s more or less I wanted to emphasize.
3. Spring Boot and project generation
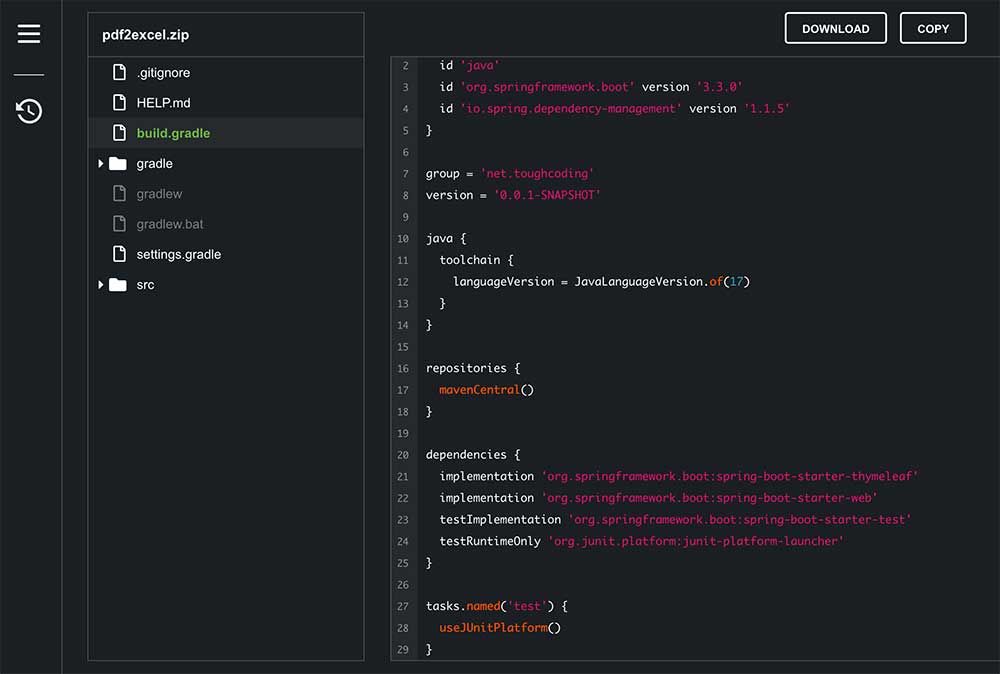
You can use wizard available via Start Spring IO page and here you can click to generate exactly same starting point as I did. Unzip that catalog and here you can start from. If you click on “Explore” you can see project structure.
4. Adding required dependencies
Look into gradle build file and add dependencies
					implementation 'org.apache.pdfbox:pdfbox:3.0.2'
implementation 'org.apache.poi:poi-ooxml:5.2.5'
implementation 'org.apache.pdfbox:pdfbox-io:3.0.2'
5. Add functionality classes
Add class to project that will perform action
					package net.toughcoding.pdf2excel;

import org.apache.pdfbox.pdmodel.PDDocument;
import org.apache.pdfbox.text.PDFTextStripper;
import org.apache.poi.ss.usermodel.*;
import org.apache.poi.xssf.usermodel.XSSFWorkbook;
import org.springframework.stereotype.Service;
import org.apache.pdfbox.Loader;
import org.apache.pdfbox.io.RandomAccessReadBufferedFile;
import org.slf4j.Logger;
import org.slf4j.LoggerFactory;

import java.io.*;

@Service
public class PDFService {

    private static final Logger logger = LoggerFactory.getLogger(PDFService.class);

    public void convertPdfToExcel(String pdfPath, String excelPath) {
        if (pdfPath == null || pdfPath.isEmpty() || excelPath == null || excelPath.isEmpty()) {
            logger.error("Invalid input parameters. pdfPath and excelPath cannot be null or empty.");
            return;
        }

        try (PDDocument document = Loader.loadPDF(new RandomAccessReadBufferedFile(pdfPath));
             Workbook workbook = new XSSFWorkbook();
             FileOutputStream fileOut = new FileOutputStream(excelPath)) {

            PDFTextStripper pdfStripper = new PDFTextStripper();
            String text = pdfStripper.getText(document);

            Sheet sheet = workbook.createSheet("Extracted Text");
            String[] lines = text.split("\n");

            for (int i = 0; i < lines.length; i++) {
                Row row = sheet.createRow(i);
                Cell cell = row.createCell(0);
                cell.setCellValue(lines[i]);
            }

            workbook.write(fileOut);
            logger.info("Excel file has been generated at: {}", excelPath);

        } catch (IOException e) {
            logger.error("Error converting PDF to Excel: {}", e.getMessage(), e);
        }
    }
}
And controller that will handle requests
					package net.toughcoding.pdf2excel;

import org.springframework.stereotype.Controller;
import org.springframework.ui.Model;
import org.springframework.web.bind.annotation.GetMapping;
import org.springframework.web.bind.annotation.PostMapping;
import org.springframework.web.bind.annotation.RequestParam;

@Controller
public class PDFController {

    private final PDFService pdfService;

    public PDFController(PDFService pdfService) {
        this.pdfService = pdfService;
    }

    @GetMapping("/")
    public String form() {
        return "form";
    }

    @PostMapping("/convert")
    public String convertPdfToExcel(@RequestParam String pdfPath, @RequestParam String excelPath, Model model) {
        pdfService.convertPdfToExcel(pdfPath, excelPath);
        model.addAttribute("message", "Conversion completed. Check the " + excelPath + " file.");
        return "result";
    }
}
6. Put graphical templates for UI
User can see web app that can manipulate over. Create under resources/templates below files
form.html
					<!DOCTYPE html>
<html xmlns:th="http://www.thymeleaf.org">
<head>
    <title>PDF to Excel Converter</title>
</head>
<body>
    <h1>PDF to Excel Converter</h1>
    <form action="/convert" method="post">
        <label for="pdfPath">PDF Path:</label><br>
        <input type="text" id="pdfPath" name="pdfPath"><br>
        <label for="excelPath">Excel Path:</label><br>
        <input type="text" id="excelPath" name="excelPath"><br>
        <input type="submit" value="Convert">
    </form>
</body>
</html>
result.html
					<!DOCTYPE html>
<html xmlns:th="http://www.thymeleaf.org">
<head>
    <title>Conversion Result</title>
</head>
<body>
    <h1>Conversion Result</h1>
    <p th:text="${message}"></p>
</body>
</html>
7. First App startup
Please build project now and then start it to see if everything is going fine.
					./gradlew clean build
./gradlew bootRun

# wait for entry in logs
# Started Pdf2excelApplication in 0.647 seconds
Open URL localhost:8080 or if you change application.properties into other value like
server.port=8089
Open localhost:8089 instead, up to you. Provide paths in UI
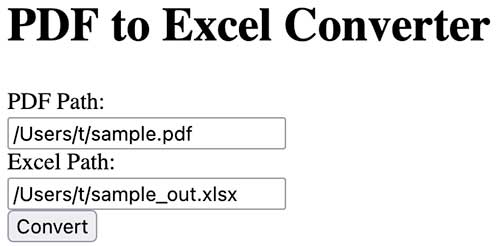
Click on convert and check resulted excel file. Because this is trival example it will simply print out parsed text onto xml excel file.

8. Dockerize app
I want to show you now how quickly convert it into Docker based project. Open terminal in main project catalog
					>ls -lt
total 56
drwxr-xr-x  10 t  staff   320 Jun  7 02:26 build
-rw-r--r--@  1 t  staff   775 Jun  7 02:07 build.gradle
drwxr-xr-x@  5 t  staff   160 Jun  7 00:04 src
drwxr-xr-x@  4 t  staff   128 Jun  7 00:04 gradle
-rw-r--r--@  1 t  staff  1220 Jun  7 00:04 HELP.md
-rwxr-xr-x@  1 t  staff  8706 Jun  7 00:04 gradlew
-rw-r--r--@  1 t  staff  2918 Jun  7 00:04 gradlew.bat
-rw-r--r--@  1 t  staff    31 Jun  7 00:04 settings.gradle
Then run wizard with Docker init answering few simple questions.
					>docker init

Welcome to the Docker Init CLI!

This utility will walk you through creating the following files with sensible defaults for your project:
  - .dockerignore
  - Dockerfile
  - compose.yaml
  - README.Docker.md

Let's get started!

? What application platform does your project use? Java
? What's the relative directory (with a leading .) for your app? ./src
? What version of Java do you want to use? 17
? What port does your server listen on? 8089

CREATED: .dockerignore
CREATED: Dockerfile
CREATED: compose.yaml
CREATED: README.Docker.md

✔ Your Docker files are ready!

Take a moment to review them and tailor them to your application.

WARNING: No build tools were found in the current directory. Maven (with the Maven Wrapper) is required to build your Java application with Docker Init. Set up Maven before running your application: https://maven.apache.org.

When you're ready, start your application by running: docker compose up --build

Your application will be available at http://localhost:8089

Consult README.Docker.md for more information about using the generated files.
8.1. First issue – wizards good if working
If you run docker compose up command you will quickly realize that this wizard is made for java maven based projects not gradle like I did. But that you can fix by editing Dockerfile.
Change below configuration
					COPY --chmod=0755 mvnw mvnw
COPY .mvn/ .mvn/

RUN --mount=type=bind,source=pom.xml,target=pom.xml \
    --mount=type=cache,target=/root/.m2 ./mvnw dependency:go-offline -DskipTests


RUN --mount=type=bind,source=pom.xml,target=pom.xml \
    --mount=type=cache,target=/root/.m2 \
    ./mvnw package -DskipTests && \
    mv target/$(./mvnw help:evaluate -Dexpression=project.artifactId -q -DforceStdout)-$(./mvnw help:evaluate -Dexpression=project.version -q -DforceStdout).jar target/app.jar
into gradle based
					COPY --chmod=0755 gradlew gradlew
COPY gradle/ gradle/
COPY settings.gradle settings.gradle

RUN --mount=type=cache,target=/root/.gradle ./gradlew dependencies

COPY . .
RUN ./gradlew build && \
    mv build/libs/pdf2excel-*-SNAPSHOT.jar app.jar
So final Dockerfile looks like
					# syntax=docker/dockerfile:1

# Create a stage for resolving and downloading dependencies.
FROM eclipse-temurin:17-jdk-jammy as deps

WORKDIR /build

# Copy the mvnw wrapper with executable permissions.
COPY --chmod=0755 gradlew gradlew
COPY gradle/ gradle/
COPY settings.gradle settings.gradle

# Download dependencies as a separate step to take advantage of Docker's caching.
RUN --mount=type=cache,target=/root/.gradle ./gradlew dependencies
################################################################################

# Create a stage for building the application based on the stage with downloaded dependencies.
# This Dockerfile is optimized for Java applications that output an uber jar, which includes
# all the dependencies needed to run your app inside a JVM. If your app doesn't output an uber
# jar and instead relies on an application server like Apache Tomcat, you'll need to update this
# stage with the correct filename of your package and update the base image of the "final" stage
# use the relevant app server, e.g., using tomcat (https://hub.docker.com/_/tomcat/) as a base image.
FROM deps as package

WORKDIR /build

COPY . .
RUN ./gradlew build && \
    mv build/libs/pdf2excel-*-SNAPSHOT.jar app.jar


################################################################################

# Create a new stage for running the application that contains the minimal
# runtime dependencies for the application. This often uses a different base
# image from the install or build stage where the necessary files are copied
# from the install stage.
#
# The example below uses eclipse-turmin's JRE image as the foundation for running the app.
# By specifying the "17-jre-jammy" tag, it will also use whatever happens to be the
# most recent version of that tag when you build your Dockerfile.
# If reproducability is important, consider using a specific digest SHA, like
# eclipse-temurin@sha256:99cede493dfd88720b610eb8077c8688d3cca50003d76d1d539b0efc8cca72b4.
FROM eclipse-temurin:17-jre-jammy AS final

# Create a non-privileged user that the app will run under.
# See https://docs.docker.com/go/dockerfile-user-best-practices/
ARG UID=10001
RUN adduser \
    --disabled-password \
    --gecos "" \
    --home "/nonexistent" \
    --shell "/sbin/nologin" \
    --no-create-home \
    --uid "${UID}" \
    appuser
USER appuser

# Copy the executable from the "package" stage.
COPY --from=package /build/app.jar /app.jar

EXPOSE 8089

ENTRYPOINT [ "java", "-jar", "app.jar" ]
8.2. Rebuild container instantly after adding change
When you change your source code it will be nice to have application automatically refreshed. There 2 types of updates – first is related to compiled sources like java or nodejs and second one is related to interpreted languages like Python or html so you simply sources can be copied(sync), this is faster but as you can see not possible in all cases. In our case it is Java so compilation is needed. Please add below code to docker compose yaml file
					    develop:
      watch:
        - action: rebuild
          path: ./src
After that you can start using
docker compose watch
And because it’s a docker you need volumes to save and read data. Bind mount will be shared between local project files and container.
					    volumes:
       - type: bind
         source: ./sampleFiles
         target: /sampleFile
Finally docker compose will look like
					services:
  server:
    build:
      context: .
    ports:
      - 8089:8089
    develop:
      watch:
        - action: rebuild
          path: ./src
    volumes:
       - type: bind
         source: ./sampleFiles
         target: /sampleFiles
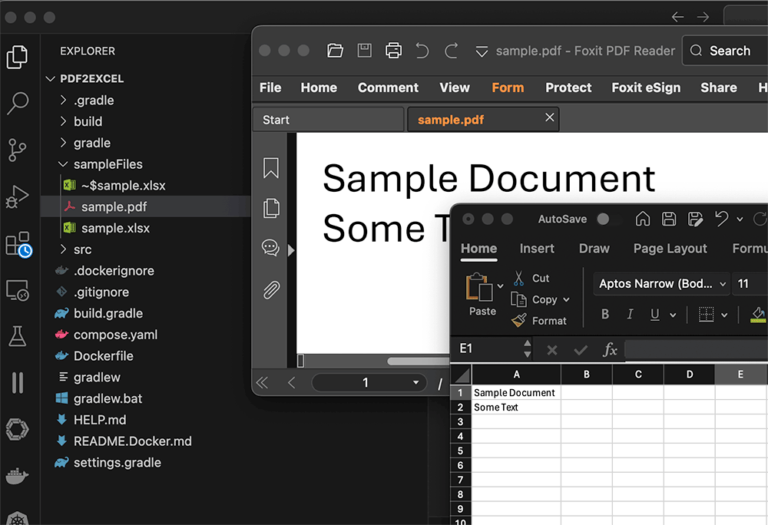
So you can see result files appear under /sampleFiles catalog
9. Next steps
You have now simple template that can be used for further development. Because final app will work on Kubernates you can extend project to be ready for that phase. Stay tuned and I will updated this article to include that part as well …
